Voice cloning is a process that uses AI to replicate a person’s voice. The AI is trained on audio samples of a person’s voice to learn their speaking patterns. Once trained, the AI can generate speech that sounds like the original person.
Here are five practical uses of voice cloning:
- Digital Assistants.
- Helping people with speech disabilities.
- Voiceovers in different languages.
- Aid in voice acting for TV, film, commercials, and video games.
- Interactive educational content.
There is a lot of power that comes with using voice cloning technology. Please use it responsibly.
This article describes how to clone your voice using Tortoise-TTS on Apple Silicon. Tortoise-TTS is a text-to-speech (TTS) system with voice cloning capabilities. As an iOS developer, I do all my programming on Apple Silicon devices. I wanted to share what I’ve learned in getting Tortoise-TTS set up and running on Apple Silicon, as I ran into some issues along the way.
Prerequisites Link to heading
- Apple Silicon laptop or desktop.
- Conda (recommend MiniConda).
- Recordings of your voice.
Manually managing dependencies in Python projects is a nightmare :scream:. Conda is a package and environment management system. I recommend using MiniConda, which is a minimal version of the Conda installer. I installed MiniConda using HomeBrew.
To train the AI model, you will need to record your voice. I used Audacity to record myself reading a few paragraphs from a book. A larger dataset will result in a better-trained model. For testing purposes, five recordings should be enough.
A few notes on audio recording settings:
- Sample Rate = 22050 Hz
- Sample Format = 32-bit float
- Each recording should be 10 - 15 seconds.
- Export as .WAV file format.
Install Tortoise-TTS Link to heading
Create a new conda environment, named tortoise. Then activate the environment. The default Python on my system is version 3.12, which is incompatible with certain packages used by Tortoise-TTS. According to the docs, we need to use Python 3.10. We also need to install the numba, inflect, and psutil packages in the environment.
conda create --name tortoise python=3.10 numba inflect psutil
conda activate tortoise
Next, install PyTorch, which is a machine learning library. To install PyTorch on Apple Silicon, use the latest nightly version:
pip install --pre torch torchvision torchaudio --index-url https://download.pytorch.org/whl/nightly/cpu
After PyTorch is installed, install the transformers package:
pip install transformers
Clone the Tortoise-TTS repo and change the directory to tortoise-tts:
git clone https://github.com/neonbjb/tortoise-tts.git
cd tortoise-tts
Run the installer:
pip install .
At the time of writing, you should get the following error: :rage:
ERROR: No matching distribution found for tokenizers==0.13.4.rc3
Fix the Installation Error Link to heading
In the tortoise-tts directory there is a setup.py file that lists several dependencies, including tokenizers:
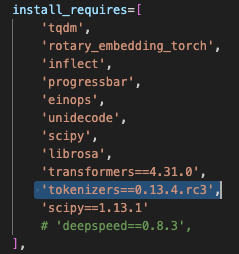
If you navigate to the Tokenizers history, you will see that version 0.13.4.rc3 does not exist. To resolve the error, change 0.13.4.rc3 to 0.13.3. Please note, I tried 0.13.4, but encountered other dependency errors.
'tokenizers==0.13.3',
Now run the installer again.
pip install .
This time, it should be successful. The output should include a success message:
...
Successfully built tortoise-tts
...
Prepare audio files for training Link to heading
Record your voice. See the Prerequisites section above for some tips.
In the tortoise-tts directory, navigate to the tortoise/voices directory. There are several sub-directories, containing .wav files for various default voices for Tortoise.
Create a new directory for your voice recordings. I named the directory robert. Then copy your voice recordings to it. My directory contains five samples of myself speaking.
~/Projects/Personal/tortoise-tts/tortoise/voices/robert
tortoise ❯ ll
total 10056
-rw-r--r--@ 1 robert  staff   581K Nov 12 10:56 audio_sample_1.wav
-rw-r--r--@ 1 robert  staff   879K Nov 12 10:57 audio_sample_2.wav
-rw-r--r--@ 1 robert  staff   994K Nov 12 10:58 audio_sample_3.wav
-rw-r--r--@ 1 robert  staff   1.2M Nov 12 10:59 audio_sample_4.wav
-rw-r--r--@ 1 robert  staff   1.3M Nov 12 11:00 audio_sample_5.wav
Generate Speech Link to heading
Now we are ready to write a Python program to clone our voice.
In the tortoise-tts directory, create a clone_voice.py file with the following contents. It’s a slimmed-down version of the notebook in the tortoise-tts repo. Update the text and voice variables.
# Import PyTorch and Tortoise.
import torch
import torchaudio
import torch.nn as nn
import torch.nn.functional as F
from tortoise.api import TextToSpeech
from tortoise.utils.audio import load_audio, load_voice, load_voices

# Instantiate a Tortoise TextToSpeech object. It will download all the models used by Tortoise from HuggingFace.
tts = TextToSpeech()

# This is the text that will be spoken. Try with more interesting strings.
text = "Hello. This is your clone speaking."

# Pick a "preset mode" to determine quality.
# Options: {"ultra_fast", "fast" (default), "standard", "high_quality"}.
preset = "fast"

# This is the voice that will be cloned.
# Set it to the name of the directory you created in the `tortoise/voices` directory.
voice = "robert"

# Generate speech with the custom voice.
voice_samples, conditioning_latents = load_voice(voice)
gen = tts.tts_with_preset(text, voice_samples=voice_samples, conditioning_latents=conditioning_latents, preset=preset)
torchaudio.save(f'generated-{voice}.wav', gen.squeeze(0).cpu(), 24000)
Now run the program:
python clone_voice.py
Depending on your system, sample voice recordings, and text, the cloning process may take several minutes. Be patient. My M1 Mac Mini, for example, took over 13 minutes to complete.

When the cloning has finished, the tortoise-tts directory should contain a generated-[custom_voice].wav file. Play the generated WAV file. How does it sound? Experiment with different text and preset options.
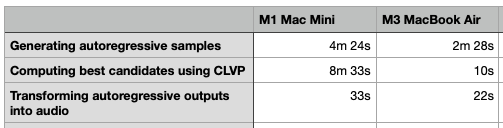
Performance Link to heading
I compared the voice cloning performance of an M1 Mac Mini, to an M3 MacBook Air. Please note, it’s not a straight hardware comparison, due to other factors, including memory differences. Nonetheless, it was interesting to see how much faster the M3 machine was at computing the best candidates.
Conclusion Link to heading
With some setup and less than 30 lines of code, it’s easy to clone your voice using AI. A larger dataset (more recordings of your voice) should improve the quality of the cloned voice. The performance comparison of M3 vs M1 is impressive. I would be interested in a comparison with the new M4 Mac Mini :smiley:. Finally, remember to use this technology responsibly.
Thank you for reading.